Tag Archives: glazing

Mystery Technique

Mystery Technique #123

Curious about the techniques used here? You can learn more next month if you’ve signed up for email updates!

ANSWER TO MYSTERY TECHNIQUE #122:

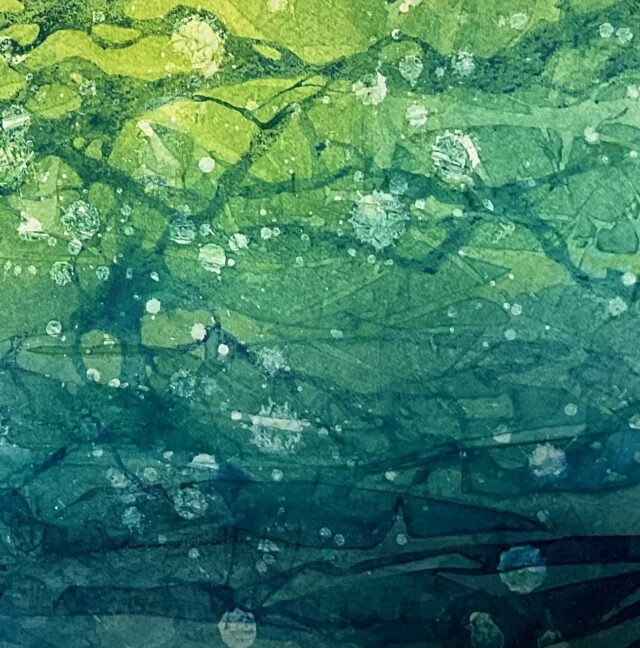
Glazing, gloss medium, plastic, and pipettes are combined for this Mystery Technique! First I used a brush to spatter the paper with acrylic gloss medium and let it dry. When I painted over the spatters with watercolor, they resisted the wet paint and created the sensation of light circular shapes floating in the color. Next I covered the wet paint with a piece of thin plastic, which stuck in places to form darker shapes. Working quickly, I manipulated the shapes with a palette knife and brush handle. After this layer dried, I removed the plastic, then repeated the process with a darker blue-green at the bottom. I used pipettes for the last layer to create an irregular network of linear shapes, drawing them with water before adding diluted blue-green and tilting the paper to encourage the paint to follow the water.

Mystery Technique

Mystery Technique #122

Curious about the techniques used here? You can learn more next month if you’ve signed up for email updates!

ANSWER TO MYSTERY TECHNIQUE #121:

The secret ingredient for this mystery technique is a white Posca pen! I started by painting layers of irregular linear shapes with diluted acrylic ink, using the dropper inside the bottle instead of a brush. After building up layered networks of lines, I scribbled on top of the dried paint with a white Posca pen. When the white lines were completely dry, I glazed over them in several places with blue-gray watercolor paint to create more depth.

Mystery Technique

Mystery Technique #120

It’s fun to paint fall leaves, especially sassafras ones! You can learn some of my favorite techniques next month if you’ve signed up for email updates!

ANSWER TO MYSTERY TECHNIQUE #119:

Negative painting is the key to this version of clouds! First I mixed water with some Winsor & Newton Cerulean Blue to make the basic sky color; then I partially wet the paper, using a spray bottle to make a transition zone between wet and dry in the approximate shape of the bigger, lower cloud. Next I “found” the clouds by painting around them with the blue. The paint followed the water in the sprayed transition zone, making it easier to mimic the irregular top edges of a cumulus cloud with my brush. Since Cerulean Blue tends to stay where you put it on wet paper, it was easy to create the softer edges of the higher clouds as I painted around them.

After this layer dried, I rewet the entire piece of paper to add some subtle yellow and the first layer of pink. Because I was using soft brushes and Arches paper, none of the first layer lifted. I darkened the blue of the sky in the next layer, using a damp piece of sponge to make transitions between wet and dry paper. The darker pink and violet shadows were added later and blended in with the damp sponge.